A step-by-step guide to setting up global Git config properties
In this article, we’ll discuss how to configure Git using the git config command to enhance your development workflow.

Team Lead - iOS who loves building mobile applications. Dynamic and passionate individual with extensive experience in application development lifecycle from concept through delivery of next-generation applications and customisable solutions in an Agile Environment.
With nearly eight years of development experience, three years of project management, I have a track record of working with top clients and building their business ideas. Continuous learner always looking for an enriching and strengthening my technical and professional skill set.
Expertise:
- iOS Application Development [Swift | Objective-C]
- Project Management
- Payment Gateway Integration [PayU, Razorpay, Ingenico, PayFort]
- Agile Development
- Postman for API Testing
- Unit Testing
- Design Patterns [MVC | MVVM | VIPER ]
- Version Control [GIT | SVN]
- Functional Programming
Find me Online:
- Medium: https://milanpanchal24.medium.com/
- Twitter: https://twitter.com/milan_panchal24
- HackerRank: https://www.hackerrank.com/milanpanchal?hr_r=1
- StackOverflow: https://stackoverflow.com/users/1748956/milanpanchal
- Github: https://github.com/milanpanchal
There is no doubt that Git is the most popular distributed version control system in the world.
In this article, we’ll discuss how to configure Git using the git config command to enhance your development workflow.
By using the git config command, we can change the configuration of our Git installation. In general, it is used to set up your git email, name, editor, and aliases. So without further ado, let’s get started!
1) Configure your Identity
The first thing you should do when you install Git is to set your name and email. This is important because every Git commit uses this information, and it’s immutably baked into the commits you start creating:
The following commands can be used to set the global Git config’s email and name properties:
$ git config --global user.email "your_email@example.com"
$ git config --global user.name "your_name"
In order to be more expressive, we can include the --add option when we set a global git config property:
$ git config --global --add user.email "your_email@example.com"
$ git config --global --add user.name "your_name"
2) Configure Git global’s code editor
Every time we execute a command such as commit and tag that let you edit messages by launching their default editor.
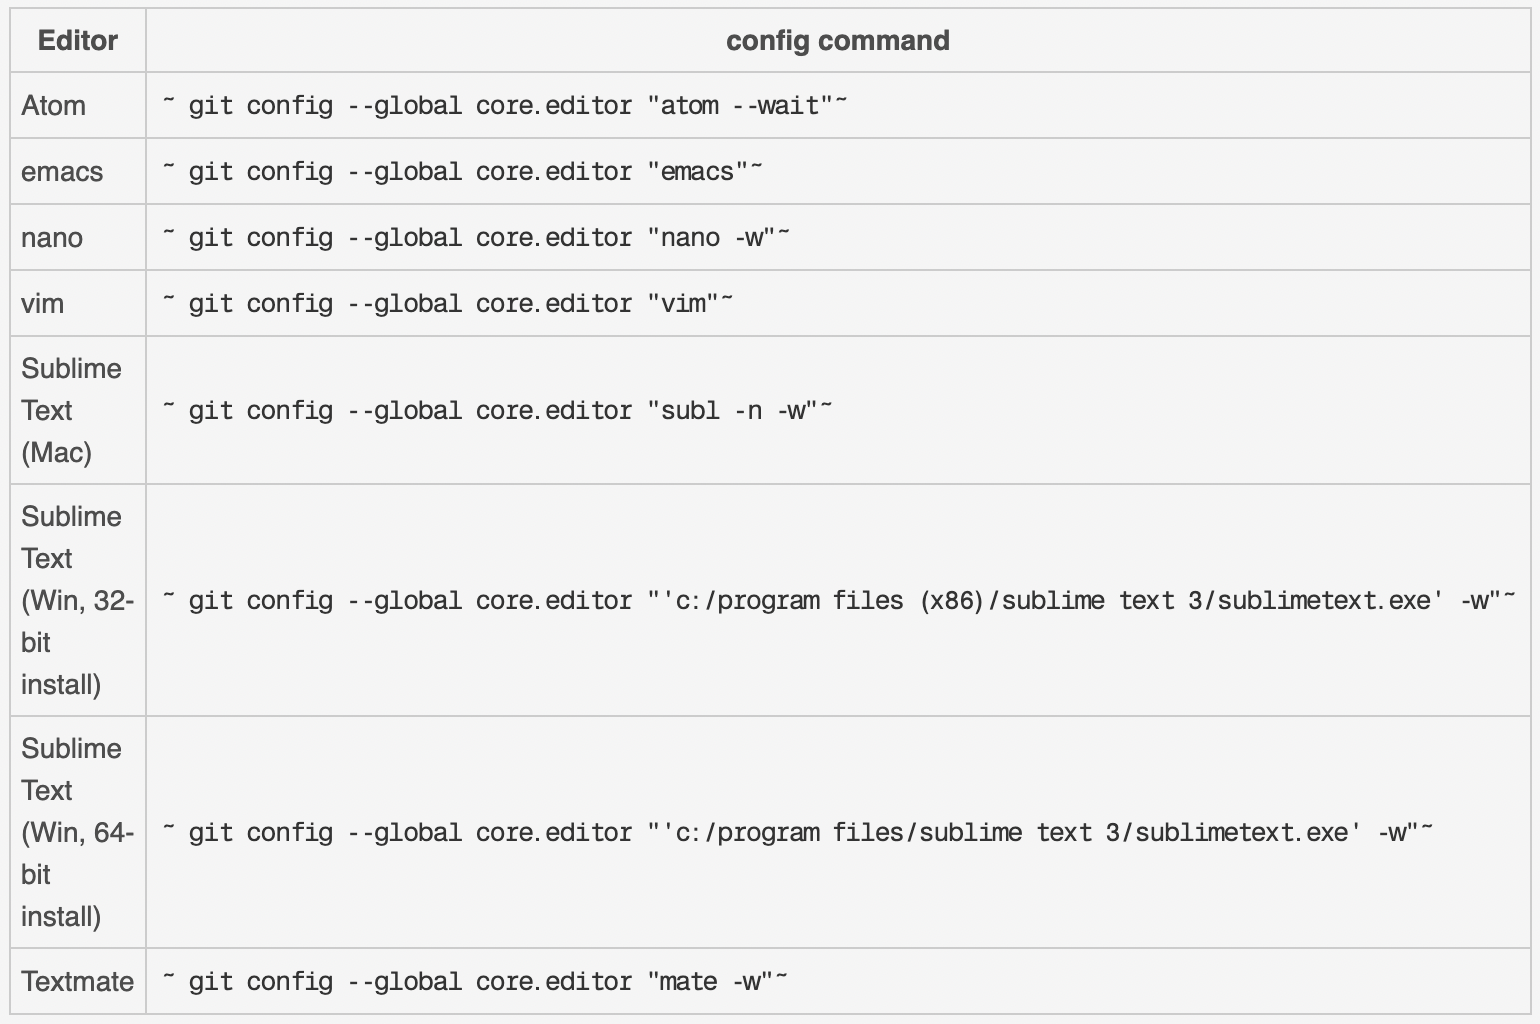
The following commands can be used to change the global Git config’s default text editor to vim.
$ git config --global core.editor "vim"
For other types of editors, please refer to the below table:
3) Configuring the default branch
By default, Git will create a branch called master when you create a new repository with git init. From Git version 2.28 (released 27th July 2020) onwards, you can set a different name for the initial branch.
$ git config --global init.defaultBranch main
After setting this variable, running git init will produce a repository whose initial branch is main.
4) Git prune during fetch
The git prune command is an internal housekeeping utility that cleans up unreachable or orphaned Git objects.
Any commit that cannot be accessed through a branch or tag is considered unreachable.
Prune is considered a garbage collection command and isn’t performed directly. To perform pruning during fetch run the following command:
$ git fetch --prune
Alternatively, if you would like to perform pruning whenever you run fetch, you can configure your fetch method in the global git config by running the following command:
$ git config --global fetch.prune true
5) Git merge tools
When a merge conflict occurs, Git will launch a merge tool.
As a default, Git uses an internal implementation of the common Unix diff program, which is a minimal merge conflict viewer.
In case you want to use any external merge conflict, you can configure it as follows:
For Example, If you want to use kdiff3 or p4merge as your merge tool.
$ git config --global merge.tool kdiff3
$ git config --global merge.tool p4merge
Also, you can also set it up as your diff.tool as follow:
$ git config --global diff.tool kdiff3
$ git config --global diff.tool p4merge
6) Git aliases
When you have to repeatedly type the same commands, Git aliases come to your rescue. They let you create custom shortcuts for your common commands.
In the Git configuration file, you can add aliases for those long commands you type from time to time. For example, commits, stashing, and so on.
Let’s say you want to add an alias for git status. In that case, you can run the following command in the terminal:
$ git config --global alias.st status
As a result, when you run git st command, under the hud it will run git status command and displays the output.
The following are the most common git aliases:
$ git config --global alias.st 'status -sb'
$ git config --global alias.co checkout
$ git config --global alias.cm 'commit -m'
$ git config --global alias.ll 'log --oneline'
7) Show global Git configuration
Git configuration has a --list flag that enables you to view all the properties configured globally.
$ git config --global --list
# In short-hand:
$ git config --global -l
Use the --show-origin flag to know .gitconfig file’s location.
$ git config --global --list --show-origin
8) Remove global git config properties
Removing git configuration settings is as simple as using the --unset flag:
$ git config --global --unset user.name
$ git config --global --unset user.email
$ git config --global --unset core.excludesfile
Sometimes, a property is set multiple times, and the --unset flag will not work. In this case, you can simply use the --unset-all flag.
$ git config --global --unset-all user.name
$ git config --global --unset-all user.email
$ git config --global --unset-all core.excludesfile
If you just want to delete the entire object like user or core, use the following command:
$ git config --global --remove-section user
$ git config --global --remove-section core
To update your git configuration details, run the following command:
$ git config --global --replace-all user.name "Your New Name"
$ git config --global --replace-all user.email "Your New Email"
9) Git config global edit
All in all, Git’s global configuration is nothing more than a text file that can be edited with any text editor. The file resides in a file named .gitconfig in the user’s home directory.
Hence, You only have to open, edit the global git config and save and close. The changes will take effect as soon as you issue a git command next time.
It’s just that simple.
By using the following command from the terminal, you can open the default git editor:
$ git config --global --edit
Conclusion
In this article, we haven’t seen everything you can do to customize how Git works by default, but we have seen some of the most common methods. If you are dying to know more about the Git configuration options then I recommend visiting the git-config documentation.
Questions?
Please feel free to comment below, if you have any questions. If you like this article, feel free to share it with your friends and leave me a comment. Thanks for reading! 👨🏼💻
This article was originally posted here:


