Create a Library Using Swift Package Manager in Xcode

Team Lead - iOS who loves building mobile applications. Dynamic and passionate individual with extensive experience in application development lifecycle from concept through delivery of next-generation applications and customisable solutions in an Agile Environment.
With nearly eight years of development experience, three years of project management, I have a track record of working with top clients and building their business ideas. Continuous learner always looking for an enriching and strengthening my technical and professional skill set.
Expertise:
- iOS Application Development [Swift | Objective-C]
- Project Management
- Payment Gateway Integration [PayU, Razorpay, Ingenico, PayFort]
- Agile Development
- Postman for API Testing
- Unit Testing
- Design Patterns [MVC | MVVM | VIPER ]
- Version Control [GIT | SVN]
- Functional Programming
Find me Online:
- Medium: https://milanpanchal24.medium.com/
- Twitter: https://twitter.com/milan_panchal24
- HackerRank: https://www.hackerrank.com/milanpanchal?hr_r=1
- StackOverflow: https://stackoverflow.com/users/1748956/milanpanchal
- Github: https://github.com/milanpanchal
What is Swift Package Manager (aka SwiftPM or SPM)?
- The
SwiftPMis a tool for managing the distribution of Swift code just likeCocoaPodsandCarthage. - It’s integrated with the Swift build system to automate the process of downloading, compiling, and linking dependencies.
- The
SwiftPMis included inSwift 3.0and above enables us to manage Swift dependencies. - With the release of Swift 5 and Xcode 11, SwiftPM support added within Xcode itself.
Here’s a step by step guide for creating your first swift package in Xcode.
Creating Your Own Swift Package:
There are two ways to create your own swift package. You can either use the Terminal application or Xcode (Version 11+) application, depending on what you prefer.
Option 1: Using Terminal
To create a new Swift package, open the Terminal application (Applications > Utilities > Terminal.app), and create a folder named MyFirstSPMDemo:
$ mkdir MyFirstSPMDemo
$ cd MyFirstSPMDemo
Or using the single-line command:
$ mkdir MyFirstSPMDemo && cd $_
Now, initialize the Swift package by running the following command in your terminal to create a Swift package directory structure:
$ swift package init
You can also specify the type of package you want to create by providing a subcommand:
$ swift package init --type library
By default, init will create a library package. To check other options use the following command:
$ swift package init --help

OVERVIEW: Initialize a new package
OPTIONS:
--name   Provide custom package name
--type   empty|library|executable|system-module|manifest

NOTE:
To open your library/swift package in the Xcode application, double click the Package.swift file.
Option 2: Using Xcode (Version 11+)
Creating a new Swift package using Xcode is a simple process:
- Open Xcode application and select
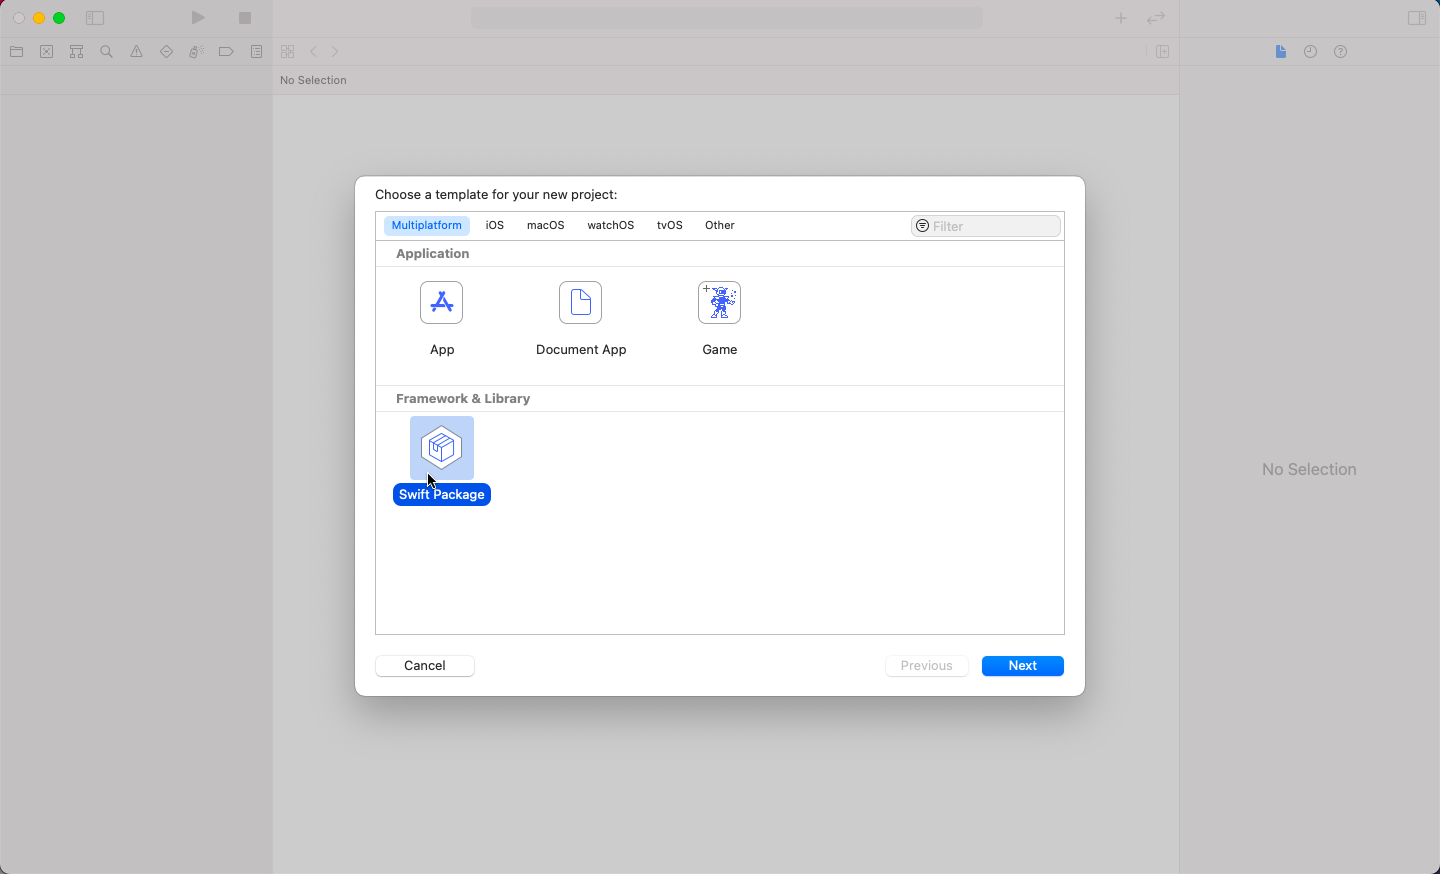
File > New > Swift Package...option or use⌃⇧⌘ Nkeyboard shortcut. - Alternatively, go to
File > New > Project...and choose theSwift Packagetemplate under theMultiplatformoption. - Type your package name, choose your location, and hit the
Createbutton - Done!
Swift Package Overview:
- A package consists of Swift source files and a manifest file. The manifest file, called
Package.swift, defines the package name and its contents using thePackageDescriptionmodule. - A package has one or more targets. Each target specifies a product and may declare one or more dependencies.
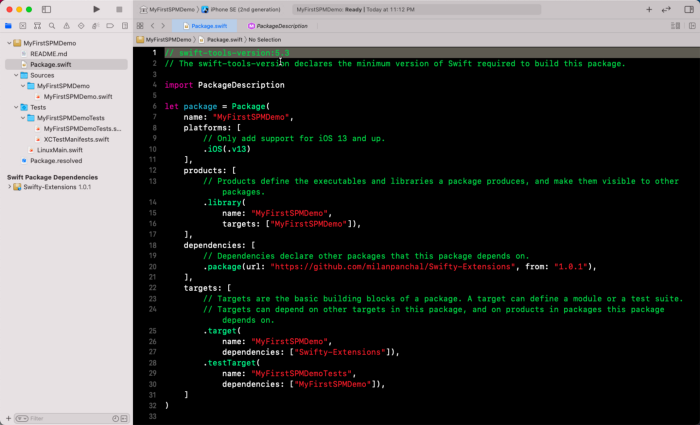
Here’s the full manifest file for reference (The Swift tools version will depend on the version of Xcode we used to create our Swift package):
// swift-tools-version:5.3
// The swift-tools-version declares the minimum version of Swift required to build this package.
import PackageDescription

let package = Package(
    name: "MyFirstSPMDemo",
    products: [
        // Products define the executables and libraries a package produces, and make them visible to other packages.
        .library(
            name: "MyFirstSPMDemo",
            targets: ["MyFirstSPMDemo"]),
    ],
    dependencies: [
        // Dependencies declare other packages that this package depends on.
        // .package(url: /* package url */, from: "1.0.0"),
    ],
    targets: [
        // Targets are the basic building blocks of a package. A target can define a module or a test suite.
        // Targets can depend on other targets in this package, and on products in packages this package depends on.
        .target(
            name: "MyFirstSPMDemo",
            dependencies: []),
        .testTarget(
            name: "MyFirstSPMDemoTests",
            dependencies: ["MyFirstSPMDemo"]),
    ]
)
In this example, we add the Swifty-Extensions framework and tell the package manager to automatically fetch the version starting from 1.0.1. This allows us to fetch versions like 1.0.2 or 1.1.0, but not 2.0.0 as that’s the next major version that’s likely to contain breaking changes.
Other options
There are other options to add specific requirements to your dependency, like using exact versions or ranges of the versions.
To get the exact version (not recommended):
.package(url: "https://github.com/milanpanchal/Swifty-Extensions", .exact("1.0.1"))
To get to the next major/minor version:
.package(url: "https://github.com/milanpanchal/Swifty-Extensions", .upToNextMajor(from: "2.0.0"))

.package(url: "https://github.com/milanpanchal/Swifty-Extensions", .upToNextMinor(from: "1.2.0"))
To get a range of versions:
.package(url: "https://github.com/milanpanchal/Swifty-Extensions", "1.0.1"..<"1.1.0")
Using specific branch or revision:
.package(url: "https://github.com/milanpanchal/Swifty-Extensions", .branch("development"))

.package(url: "https://github.com/milanpanchal/Swifty-Extensions", .revision("51cc4b03d7a855633626f016f05706a4ae527d89"))
Build and Test Package
- To build your Swift package, run
swift buildcommand in the terminal. The package manager downloads all of the dependencies (declared inPackage.swift), compiles them, and then links them to the package module. - Downloaded sources are available under the
.build/checkoutsdirectory at the root of your project, and intermediate build products in the.builddirectory at the root of your project. - To run the tests for your Swift package, use:
swift test.
$ swift build
$ swift test
Publishing Your Swift Package
To publish your Swift Package, simply create a new version tag and push it to your Git repository. You can use Xcode or the Terminal application to publish your package.
$ git add -A
$ git commit -m "My First Swift Package Demo"

// git tagging
$ git tag 1.0.0

// To push the specific tag
$ git push origin 1.0.0

// To push all the tags at once
$ git push origin --tags
Building an Executable
- A target is considered as an executable if it contains a file named
main.swift. The package manager will compile that file into a binary executable. - The process of creating an executable is almost the same as that we used to create the library package.
- First, create and enter a directory called
MyFirstSPMDemo:
$ mkdir MyFirstSPMDemo && cd $_
Now run the swift package’s init command with executable type:
$ swift package init --type executable
Use the swift build and swift run commands to build and run the executable:
$ swift build
$ swift run
Questions?
Please feel free to comment below, if you have any questions.
If you like this article, feel free to share it with your friends and leave me a comment. Also, click on the 👏 clap button below to show how much you like the article.
Thanks for reading! 👨🏼💻
You can find me on:
Twitter | Tooter | LinkedIn | GitHub | Medium | HackerRank | LeetCode | Stack Overflow


